

Tuesday, January 8, 2013
'Wrapped Jewelry" Pinterest Party
Wednesday, January 2, 2013
Softball Ornament Family

Here is a set of ornaments I made for my daughter and her family. I used purchased bottle cap blanks and created my softball stuff with my printshop software. There are clear resin half-domes that fit over the printed softballs. I had to make a bottom hole in the top two bottle caps to link the three togbether.
Our whole family is softball craZy--grandpa, son-in-law, and daughter coach; granddaughter plays; grandson plays little league baseball; other daughter still playing softball. These can be custom made to suit anyone, and I don't think they have to be just set up as Christmas ornaments.
Softball Bottlecap Ornament--$6.00 each, including shipping
Leave an order at centralcitysoftball@gmail.com. Check our boards on Pinterest for our merchandise for sale as spring comes closer.


Handmade Recycled Silverware Ornaments


These spoon bowls were flattened and stamped with metal stamps with the word FAITH or PEACE and then the outer edges were covered with seed beads and varnished. The light makes the bottom one a little more "brassy" colored than it really is. I am working up a tutorial for how to do these, so check back soon.
Tuesday, May 18, 2010
Memory Boxes and Tea Time with Ally
 A couple of years ago I made a memory box for my granddaughter Alexandria. I realized that she was growing up so quickly. For almost 8 years we had had all kinds of tea rituals, whether I was visiting her or she was at our house--we ALWAYS had to have tea. When she was at our house, quite often she had a good friend Bailey over to play, and they would always want to have a tea party.
We have many great memories and lots of photographs of our tea-times together. When I saw a memory box and the directions to make them, I saw a project that I could really enjoy, so I made a memory box for Ally about our tea parties.
The outside measurements of the box are 4" x 4" x 4". The lid is 4" x 4" x 2". The entire box and lid are made with fairly heavy scrapbooking papers. When you pop off the lid, which I decorated with a small old spoon wrapped with wire and beads and bent in the shape of a handle, the box "explodes" with three more layers of photo pages. The pages are all glued together on the bottom square.
As you can see below, I glued a little cup and saucer that Ally had used all the time at our house, to the center atop a paper doily. Then I proceeded to fill the pages with all kinds of photos and other memorabilia. You can see a photo of her wearing a little sun hat--at that particular time, she was on the hunt for Peter Cottontail. We almost wore out the storybook of Peter Cottontail, and she was convinced that a rabbit that ran through our yard all the time was Peter. She also was sure that Mr. MacGregor's garden was just down the street from where she lived. Her first tea set had a Beatrix Potter theme. I glued a little photo of the set over the corner of her picture.


I had written a poem years ago about my grandmother having me (and the rest of her grandchildren) over to her house for tea, or more often, coffee, and cookies. Her coffee was so weak our parents never worried about us drinking too much caffeine. Maybe that was the way they made coffee in Sweden when she was a child. At any rate, I wrote the poem, embellished a few things here or there for the sake of a better rhyme scheme or plot line. Originally I used the poem on a framed collage which included an old spoon. But for this box, I simply typed the poem and printed it in a text size that would fit on the page. (Each page of the exploding box gets a little smaller as they come toward the middle, so you have to figure out what you're going to put on each page, accordingly.) There are 28 "pages" to put things on.
"Grandma's Spoon"
When I was young I used to go
To Grandma's house for tea.
And she would have the table laid
As pretty as can be.
She showed me how to pour the tea
And where to place my spoon;
I think she had a feeling that
I'd grow up all too soon.
We'd sit and talk of many things
And while away the hours.
We'd even take a little stroll
Among her lovely flowers.
Those days are gone, and Grandma, too;
She left us all too soon.
But I still treasure those memories
Reflected in a spoon.
Judy 2002
Towards the upper left in the photo below, I wrote a little piece about Ally's and my parties together. In the foreground you can see a page that folds out, and there is a photo of me on the left, Ally in the middle, and my friend Sharon on the right. Ally and I entertained that morning, and we all wore fancy hats--although I don't know where ours are at the time the photo was taken. We planned our menu, made cookies, and set out our fancy dishes. She was so cute as she poured the tea and served the cookies with such good manners.

Many times we made sugar cookies to go with the tea. Ally and her brother AJ love to roll out the dough and use the cookie cutters. We still make cookies for many occasions. I included the good-old-standby recipe that we always use. It came from a cookbook compiled by a group of teachers probably 25 years ago. The recipe card pulls up from a pocket that has a bunch of sugar cookie shapes on a plate sitting on a lace tablecloth.
 Grandma's Sugar Cookies
3 c. flour 1. Mix dry ingredients and sift together.
1 tsp. baking power 2. Add margarine and mix until like coarse
1/2 tsp. salt cornmeal.
1 tsp. soda 3. Blend beaten eggs with vanilla and milk.
1 c. sugar Make a hole in the center of the dry in-
1 c. margarine (not softened) gredients, pour in liquid, and mix from
2 beaten eggs center of bowl. Dough will be stiff. Chill.
2 tsp. vanilla 4. Roll out on floured surface and cut or use
4 tbsp. milk cookie press. Place on ungreased sheet.
5. Bake at 375 degrees 6-8 min.
On the left top of the page below you can just barely see Bailey sitting at a little table as they had tea one day. I made the table how up as a pop-up that opened out, and Ally is sitting on the other side that you cannot see. Those two girls STILL love to dress up in fancy clothes and have fun together. They live 60 miles apart from each other and whenever Ally comes to visit, she always asks if she can see Bailey. How great to have a friend and not be stuck with just the "old folks," Grandma and Grandpa!
On the left top of the page below you can just barely see Bailey sitting at a little table as they had tea one day. I made the table how up as a pop-up that opened out, and Ally is sitting on the other side that you cannot see. Those two girls STILL love to dress up in fancy clothes and have fun together. They live 60 miles apart from each other and whenever Ally comes to visit, she always asks if she can see Bailey. How great to have a friend and not be stuck with just the "old folks," Grandma and Grandpa!
On the page on the bottom right in the oval frame, is little brother AJ. He is strictly ALL BOY, and his dad was a little worried that I'd have him doing tea parties also. Well, I didn't invite him--he just couldn't stand the idea of Sister and Bailey having a party without him, so quite often he invited himself along! He has his tea cup and saucer and salad plate sitting in front of him.
On a sidenote--once when AJ was staying alone with us, our neighbor was having a garage sale. He had a great little ice cream parlor table and chairs for sale. AJ and I borrowed it, set it up in the back yard, and propped one of Sister's dolls up and a tea set. I snapped several pics of my little guy pouring tea for the doll. In about three minutes he was done and ran off to play with his cars. I took the best photo and had it enlarged and framed and gave it to his dad, my s0n-in-law, for Christmas.

I left a few of the little pages blank, because I knew there were more photos and probably more memories Ally would want to include. All in all, I was very happy with the way it turned out. So many people liked the box and the idea that we gave a class on making them at the library. About 12 people really enjoyed it, and one young lady won a purple ribbon at the State Fair for her 4-H project. I have made and sold probably 25 or 30 different ones. My friend and I have made boxes for graduations, birthdays, babies, sports, and lots of other things.
I will have another post on directions about how to make them--they really are pretty easy!
The lids are the same as for the previous post about the gift box to Albuquerque. I really do need to get the lid directions posted! Think about ways that you can preserve a fond memory or memories with your friends and loved ones....it really is as fun to make as it is to receive!
The lids are the same as for the previous post about the gift box to Albuquerque. I really do need to get the lid directions posted! Think about ways that you can preserve a fond memory or memories with your friends and loved ones....it really is as fun to make as it is to receive!
Saturday, May 8, 2010
A New Friend in New Mexico
 Here's the box that started it all...it looks pretty innocent, just a 4" square box that opens up to a flat 12" square with nine little areas of fun places for photos and memorabilia.
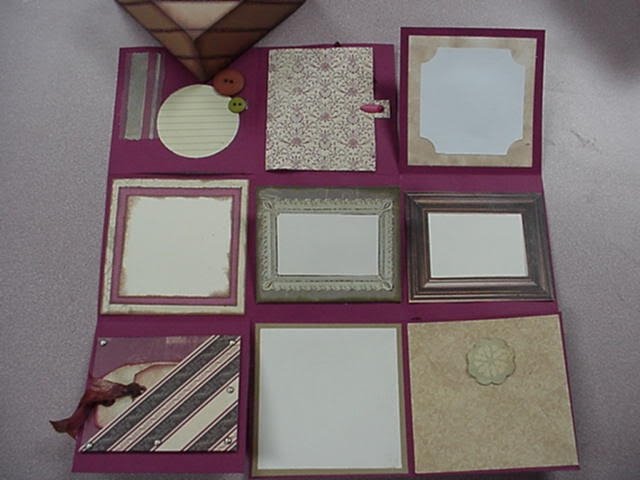 The lid had a little metal embellishment circle on top. I had it for sale at "B Inspired," my favorite shop, and it was just minding its own business last fall when a gal came in and purchased it.
Now, let's jump several months ahead to the middle of April. A message on our answering machine was from a lady named Carol who was trying to track down the person who had made the box she received for Christmas from a friend. Lo and behold, she lived in Albuquerque, New Mexico! Now my curiosity was really piqued...how did a box I made in Central City, NE wind up clear down in the Southwest??? It turns out her friend had traveled through our fair state of Nebraska last fall.
Carol was interested in having me make a box for a friend of hers for her birthday in May. We corresponded via email and I learned that Carol had retired from an office position at the University of New Mexico and that she is a "First Reader" for the UNM Press. Sounds like someone I will hit it off with!
I had a lot of clues about her friend that helped me make a very unique box as a birthday gift. It has lots of movable and removable parts, and interesting little features. There is not as much area to put personal photos in as usual because I did get a little carried away with the clever(?) bits and pieces. Here is the box, with some instructions or comments about how the parts were made.

I had this scrapbook paper that was nice and heavy, and had kind of a "shabby chic" look to it. It had the greens and black and white that Carol mentioned her friend liked, and I think it looks rather sophisticated with the foreign words. I divided the paper into 4" squares, 9 in all, and drew very light lines with pencil on the inside. Then I took a ruler and a bone folder or some other tool with a crisp edge, and scored the lines. (Scoring simply means you make a crease on the lines but you do not press hard enough to cut through them. Scoring is an essential step to make your box edges fold sharply and accurately.)

If you look closely, you can see that I made four cuts, each 4" long, just to the center square. I would cut in a line then skip a line, rotate the paper a quarter turn, then repeat the whole process 3 more times. You can see where I folded the uncut side toward the other cut; all around the inside square I folded the sides up, which becomes the bottom of the box. To shut the box, you just bring up the sides, and one side nestles inside the other, to form a 4" box. 
Here is one of the nine little "pages" in the box. It is a folded "flower" design, which is created with intricate folds and by pressing the edges crisply. 
When you unfold all the little sides, there is a space inside for a circular photo or other embellishment. I chose to put in a clear acrylic piece that has a few words of wisdom about travel and discovery. It tucks back into the folded flower with very little effort. I glued the whole thing onto a 3-7/8" square piece of scrapbook paper and pondered which of the nine squares of my box shape to glue it to. I finally decided to make the individual "pages" or squares, and then arrange them to my liking and glue them down later. I am glad I did because there were some ways that looked better than others, or that shut up or closed better than others when I had them all done. Note: I glued all my objects to 3-7/8" squares, so the box would close easily. 
Another page, which wound up being the center square, was a moveable puppet that I found a pattern for online and made it small enough to fit in the box, even if she had to be in a strange physical position. ( I will see if I can find the free website that had such adorable moving pieces.)I made the outside 7-7/8" x 3-7/8," folded the two sides in 2" and put a grommet and ribbon in place so it could be tied shut. Then I used a gold pen and wrote "All the World's a Stage" in gold ink. 
For the puppet, I used cardstock and very small paper-fasteners such as are used in scrapbooking to hinge the arms, legs, and head. I used odd- and end-pieces of patterned scrapbook paper for her clothes, and I really like the colored plumes on her head! I added a star or two, and we were ready for stardom!

Carol told me that both she and her friend are fans of the Robert Sabuda pop-up books, and I found a really simple but pretty 3-D flower on his website. He has many great pop-ups and movable patterns. Since her friend likes flowers, this one seemed a natural. I made the inside first, with the pink flower, and glued it onto a plain white piece of cardstock. Then I made the outside of the "book" with some hand-made paper with leaves and flowers pressed into it. It ties shut with ribbon. Using grommets really helps protect the paper covers from tearing. 
I inked the edges of the little saying and glued it onto the inside; it says "Friends are flowers in life's garden." I also inked the edges of the pink cardstock pieces with a darker pink and it really helps the petals stand out. 
Last year I used a trunk idea as a design for the cover of a play about the pioneer days, and I thought it could work for a page in this box as well. I tinkered around with some paper and finally got my trunk the right size and configuration for the 4" area. I think the brown paper is probably about 9" or 10" tall and 3-7/8" wide. I folded it so the top of the trunk came over the bottom, and I made sure to cut out the tab in the center of the lid that would slide down through the suede leather strip I fastened down with the two paper fasteners. It serves the purpose of keeping the trunk closed when the tab is slipped through the leather. I used stamping ink and colored pencils to give the trunk some dimension and age. I used a white colored pencil to doodle a kind of design in the center of the lid. A few suggestions of wood and age with a black pencil, and the trunk was ready to go.
I took two pieces of cardstock approximately 3" x 6" and folded them in half. I then stitched down the center fold with my sewing machine. After inking the edges, I glued the front and the back pages of the book onto the trunk, and then I glued the whole thing onto a piece of 3-7/8" paper. Here's a place to display some small photos.
I found the best quote from Eleanor Roosevelt while I was scavaging through sites on my computer, and I knew I had to make a page for it. I cut out the teacup from a printed scrapbook paper and I kept the left side connected on the fold for part of the cut. Putting a piece of white paper at the top gave the impression of the inside of the cup. I could have the teabag tag sticking out through the cup that way, too. I added some old crocheted edging to the background paper and glued the cup on.
I took a teabag and slit it in the back and took out most of the tea leaves. Then I coated the rest with some acrylic varnish to give it a wet look and also keep the tea leaves in place. The inside of the cup reads "Women are like tea bags; you never know how strong they are until they get into hot water." Eleanor Roosevelt. Don't you just love it???
This page features a 3-pocket square. Using 3 different colors of paper, I cut 3 more-or-less triangle shapes, each bigger than the last. (Note the triangle is distorted on the left side so the edge can come up higher to hold more.) They are fastened with grommets and glued onto a 3-7/8" square piece of cardstock. There are three tags that are fastened with a metal hook and chain I purchased at a craft store. The chain is secured to the top grommet. I used some little stamps here and there. These little pockets are great for slipping in little photos or other memorabilia. 
My Cricut machine has a cartridge called "A Child's Year," and features all silhouette figures. I have used the two little girls having tea for greeting cards, and I thought it would work here, too. The cover says "Nothing is better than time to spend, laughing and talking with you, my friend." It features a glass flower and a metal fastener that swings out of the way to open the page. 
Inside, the silhouette figures of the two little girls are very striking against the light background. 
Using a transparency that has a lot of synonyms for "friend" printed on it is a way to create a space where a small photo can be slid in behind it and still show up. I inserted a photo of two friends I found on the Graphics Fairy website, but it can be removed and a more personal photo put there. The rounded indented corners are first on black then white paper and secured with paper fasteners. Of course it is secured to a 3-7/8" piece of scrapbook paper.
My Cricut machine also cuts out fantastic little scrolls and corners and other decorative embellishments like the burgandy one here on this page. I like these corners because you can slip photos in easily. I just put in another image from the Graphics Fairy (one of my favorite blogsites) to show how it could be used. I think it's a good idea to have some relatively flat pieces to counter-balance the thicker or bulkier pages. 
Okay, I got all nine "pages" done. Next, I tried them in various arrangements on the inside of my breen/black/white/paper that I had marked and cut. I like it when they are all viewable from one direction, so I settled on my arrangement and glued those squares down onto the inside of my box. This is the arrangement I came up with. I kind of had a bulky, then less bulky, then bulky, etc. arrangement. You will understand when you try to close the box up, that too much bulk on ones next to each other makes it harder to close.
Here's how the pages all fold together. When you pop the lid on, the pages stay nice and square.
Here's the finished box again. I picked up the old china knob at a garage sale for 10 cents and attached it with a nut and bolt to the black lid. This post is getting so long that I don't want to give the instructions for making the lid. I'll do that in the next blog. Carol is giving her friend the box this week, and I can't wait to hear how she liked it. I'll post more on Carol when I do the box lid tutorial. I am always amazed when Chance or Serendipity or ...call it what you will....makes fun things happen and new people appear on the horizon! The Muses are busy, showing me the way to new friends, new ideas for creating things, and in general, making my life more fun, full, and meaningful. May it always be so for me and for you, too!
Tuesday, March 30, 2010
Bottled Wishes
A whimsical project that I have been dabbling with is what I have named "Wish Bottles." The card that is attached to each bottle reads:
Wish Bottle
Wishes, Hopes,
Prayers, & Dreams...
Wanting something
Sometimes seems
To be so far from reality.
But this spirit bottle is meant to be
A symbol of your fondest desires
From silly things to heartfelt fires.
Just whisper your desire in the bottle so bright
And put on the cork to seal it in tight.
If your desire was meant to be
It will show itself to thee.
Sometimes our desires are not what they seem
So we look elsewhere for another dream.
Whatever we do, whatever we pray,
We hope life is better every day.


The bottles are fun to look for and find, and I tried the technique of using an embossing pen and powder, then using the heat gun. I figured the words, etc., would be on the glass pretty good--not the case. I had to spray a coat of clear lacquer on them. For the most part, they probably would be okay, unless ya had lots of wishes! The fun part for me is the wire, beads, and other embellishments that transform a bottle into something entirely different.
I'm planning a display area at B Inspired that features all fairy kinds of things, so I thought I'd put these bottles there, too.
Subscribe to:
Posts (Atom)
Please add your thoughts and comments to the posts. I appreciate your input.

My Blog List

Popular Posts
-
 Softball Ornament Family Here is a set of ornaments I made for my daughter and her family. I used purchased bottle cap blanks...
 -
 Here's the box that started it all...it looks pretty innocent, just a 4" square box that opens up to a flat 12" square with n...
 -
 A couple of years ago I made a memory box for my granddaughter Alexandria. I realized that she was growing up so quickly. For almost 8 years...
 -
 Grandma and Ally Tea Memories Box There is a more detailed explanation of this box in an earlier blog. Below is a shot of the ...
 -
 A whimsical project that I have been dabbling with is what I have named "Wish Bottles." The card that is attached to each bottle r...
 -
 We have many interesting events and activities at our local library, but one of the newest and most fun is our...
 -
 Handmade Recycled Silverware Ornaments These spoon bowls were flattened and stamped with metal stamps with the word FAITH or PEAC...
 -
 My last post was about old friends and old shoes and the comfort to be found in both. This time I want to look at new shoes and new friends,...